
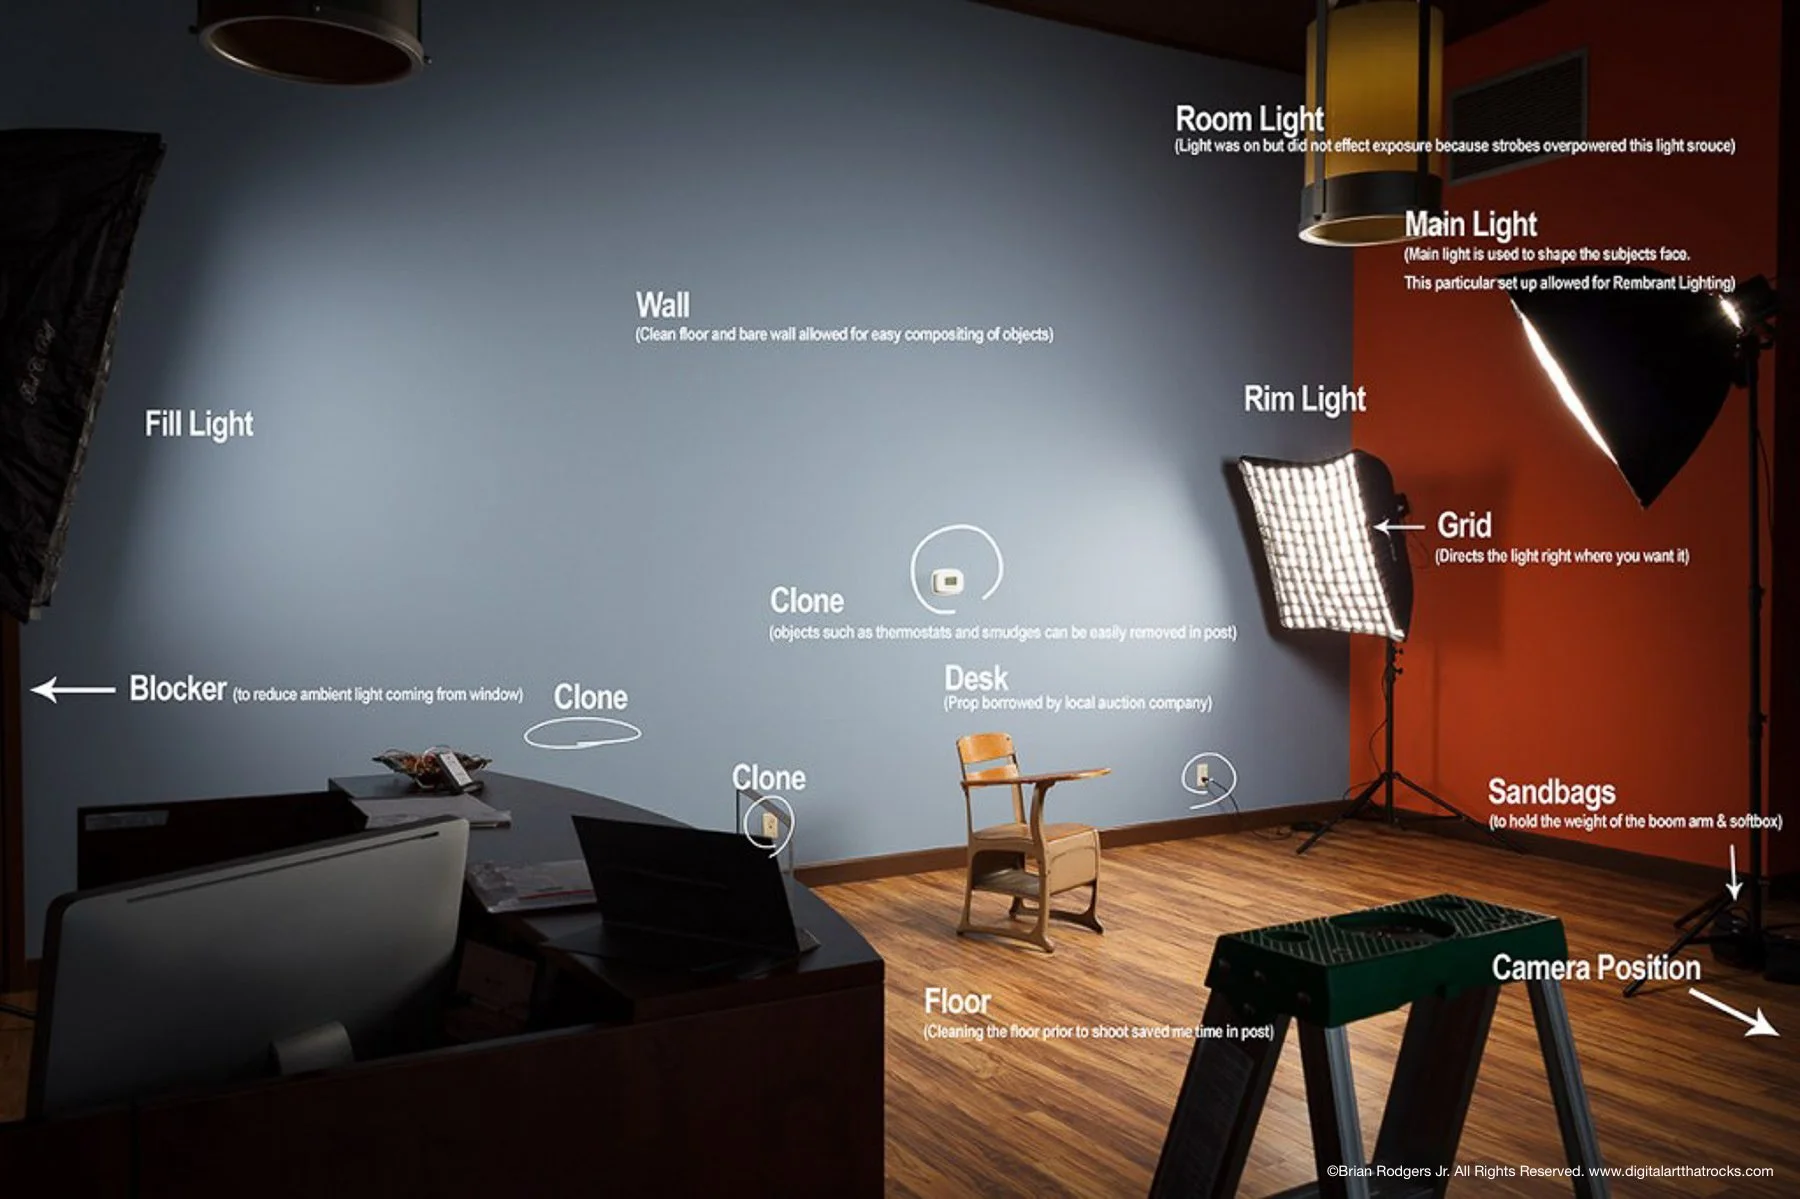
Here’s a diagram of what’s going on in my head when I’m preparing for a successful commercial photoshoot.
Behind the Scenes with Commercial Advertising Photographer Brian Rodgers Jr. - Digital Art that Rocks™
Planning
Planning is key to any successful commercial photo shoot. Being that I work for an advertising agency, there are often many players in the planning stages of a shoot. Sometimes the ball is in my court to come up with visuals for a given clients needs. Other times there is a Creative Director conceptualizing the ideas. Often times however, this is a collaborative effort between creatives at the agency. Once the ideas are drafted on paper, my job as the photographer is to execute this idea as a deliverable to the client.
For this particular shoot, I was creating the atmosphere of a classroom. More on the conceptual side; less on the classroom full of desks and kids side. So, I really had to think about how I was going to convey this space without actually having all of the classroom elements in place. The elements that I had to work with were; a nice wood floor, a neutral colored solid wall, a desk, and a model. The rest of this shot would have to be created in post because I didn’t have the items at the time. I knew that it would be easier to composite these items in photoshop, than it would be to go out, buy the items, and place them on the wall.
I always pre-plann the shoot as much as I a possibly can. It puts my mind at ease knowing exactly how I will put the final shot together. I knew that the way I shot it would allow me to composite elements later in photoshop. These elements included a chalkboard, clock, books and a bookshelf. Knowing exactly where I would later place these items in the scene, allowed me to properly frame my composition and allow for a successful photo shoot.
The bottom line here is to plan as much as possible. Paint a clear picture in your head of what you will be creating. Know what you’re going to shoot, and know what you are going to do in post. Always shoot with post production in mind.
Prepping
It’s always important to prep the scene you are shooting. In this particular example, the floors were a mess due to the winter season. I know from experience that it will take less time to actually clean the floor, than it would be to use photoshop to clean it up later. I had to move other furniture out of the way to create the space I needed for the shot. You can’t see from the above image, but there are some massive windows at the agency. So I used blockers to darken the window light coming in just a bit.
Lighting
Another important factor to this particular shoot was the time of day that it was shot. I planned the shoot at 3pm. Why 3pm? Because the sun would be behind the building at that time. This room is surrounded by windows which means direct sunlight. I want to control the light in my environment as much as I possibly can. Shooting at 3pm allowed 3 things to happen; no direct sunlight, softer ambient light, and less light altogether. This also meant that I didn’t have to raise the power of my strobes to the point of blinding the model. At a shutter speed of 200th of a second, ambient light was not an issue. My strobes were calling the shots.
Pre-lighting the set is always important in any successful commercial photo shoot. It equally important to be able to get the shots you need in a short amount of time. Pre-lighting the set allows me to relax and focus on the model. Minor tweaks will be needed when the model walks on set, but it’s a great idea to have your lights metered and roughed in.
When lighting people in a scene, there are two things to think about. The light on the model, and the light in the scene. I used my main light to create a Rembrandt lighting pattern on the models face. Get to know lighting patterns of the face. I highly recommend studying classical and renaissance period portraits. The lighting was amazing then, and still looks amazing on people today. Second, consider the background. The way I lit this scene created depth. My main light lit most of the scene. My fill light acted like a large window, and my rim light gave a nice separation of the subject and background.

Post Production
This is where it gets interesting. I knew that I would be adding a chalkboard and clock to the wall. I didn’t know that I would be creating a bookshelf (full of books) from scratch. As luck would have it, I needed to fill a little more space in this image to create realism and depth. I searched for stock images but couldn’t find a bookshelf that matched the angle, style or the light of the scene. This is where my mastery of photoshop comes in to play. I created a bookshelf from absolute scratch in photoshop. I created a base, added a wood texture, and simulated lighting to match the scene. I didn’t have my camera on me that day, so I used my droid bionic camera to photograph books in multiple set ups. Knowing that I could darken them down and hide them a bit helped sell the shelf.
Unfortunately, I don’t know that I can show the final image on my blog. Though I created the shot, I’m not sure if I have permission to show it here. Having said that, it is my personal goal to create more personal work this year. And I will indeed be posting that. Just know that I am creating a ton of great work for the agency that I work for and I’m super busy; which is why I don’t write on my blog much. I’m hoping to change that. Until next time…
-Brian
